onsdag 1 augusti 2018

There's Snowbody like you


Christmas in July
A challenge for Gummiapan
-----------------------

There's Snowbody like you


Snowbear is sitting at the beach with a christmas tree  & some presents a Big parcel and Small parcel 
and all he wants is some Christmas feeling.
 He has even borrowed Santa's hat.
Then as a miracle
 Mr Grey is coming in the sky with some snow and a banner " There's snowbody like you".

What a wonderful Christmas!

DT-Lena


onsdag 25 juli 2018

The life in the ocean


Hi there!

At last...a stamp with a Pelican! For a long time I've called the Flamingo dies for Pelicans. I know they are flamingos, but I keep on saying pelicans.
So, here is my Fla.... just kidding... Pelican.

-----------------------------------

Hej där!
Äntligen...en stämpel med en Pelikan! Jag har länge kallat Flamingo dies för Pelikaner. Jag vet ju att det är flamingos, men fortsätter säga pelikaner.
Så, här är min Fla... skojar...Pelikan.


When I made this card I stamped and masked first and then I distressed the ocean, sky and sun.
Stamps that I used:
The die is: Scalloped Squares

-------------------------------

När jag gjorde detta kort stämplade jag och maskade först och sen distressade jag havet, himmel och solen.
Stämplar som jag använde:


__________________________________________________________________

In my next card
I used a lot of the new stamps to create the life in the ocean.

-------------------------------

På mitt andra kort
använde jag många av de nya stämplarna för att skapa livet i havet.

Stamps:


-------------------------------

Stämplar:


__________________________________________________________________

And here's my last card for this time "Sea you soon..."

-------------------------------

Och här är mitt sista kort för denna gång "Sea you soon..."

For this card I used this stamps:
Me and Doris borrowed some bubbles from Nemo
The die is: Stitched squares
I used glaze at the bubbles and the sjögräs.
When I made this card I stamped and masked first and then I distressed the background blue.

-----------------------------------

Till detta kort använde jag stämplarna:
Jag och Doris lånade bubblorna från Nemo

-------------------------------

That was all from me for now
Sea you Soon!

Det var allt för mig för tillfället
Sea you Soon!

DT-Lena

tisdag 10 juli 2018

Pop Up Card " Your're perfect the way you are"

Hi there!

I'm back with a PopUp Card for someone special.
I'm gonna start with showing you the card & what material I've used. 
After that you get a tutorial.

------------------------------

Hej där!
Nu är jag tillbaka med ett PopUp Card för någon speciell.
Jag kommer att starta med att visa kortet & vilket material jag har använt.
Och efter det så får ni en tutorial.


Front of the card
--------------------------------
Framsidan av kortet


I used:
Gummiapans Paper Svart serie & Grå serie
Die: Lennart
Banner ( from a goodiebag that I got at Trelleborgsträffen)

------------------------------

Jag använde:
Gummiapans Papper Svart serie & Grå serie
Die: Lennart
Banner ( från en goodiebag som jag fick på Trelleborgsträffen)


Inside the card
--------------------------------
Insidan av kortet


I used:
Gummiapans Paper Svart serie & Grå serie

Dies: Hello

------------------------------

Jag använde:
Gummiapans Papper Svart serie & Grå serie

Dies: Hello


And here comes the tutorial, I hope that you understand what I mean.
-----------------------------------------
Här kommer beskrivningen, jag hoppas att ni förstår vad jag menar.


Tutorial PopUp Card


Cardbase:
1 piece 13 x 27 cm cardstock
4 pieces 12,5 x 12,5 cm patterned paper


PopUp part:
1 piece   17 x 17 cm cardstock
2 pieces   9,3 x 8,3 cm cardstock
6 pieces  7,8 x 7,8 cm patterned paper
2 pieces  7,5 x 7,5 cm patterned paper

----------------------------------------

Kortstomme:
1 del  13 x 27 cm cardstock
4 delar  12,5 x 12,5 cm designark

PopUp del:
1 del   17 x 17 cm cardstock
2 delar  9,3 x 8,3 cm cardstock
6 delar 7,8 x 7,8  designark
2 delar  7,5 x 7,5 designark


_________________________________________________________________________________


Cardbase:

  • Begin with the cardbase, cut out 13 x 27 cm in cardstock. Score at 13  & 14 cm so that you get a spine at 1 cm.
  • If you want a ribbon, attach them before you attach the patterned paper.


------------------------------------------


Kortstommen:
  • Börja med kortstommen, skär ut i cardstock 13 x 27 cm. Biga 13 & 14 cm så att du får en rygg på 1 cm.
  • Vill du ha band så fäst dom på stommen innan du fäster designarket.


  • Cut out 4 pieces in patterned paper 12, 5 x 12,5 cm, it's both for the inside and outside.

-----------------------------------------

  • Skär ut 4 delar i designark 12,5 x 12,5 cm, det är både till ut & insidan.

----------------------------------------
The PopUp part:
  • Cut out in cardstock 17 x 17 cm
  • Score at 8,5 cm at both sides, then you get 4 squares, those scorings should be "valleyfold" 
  • Now score diagonal, this score should be "mountainfold", this is so that the PopUp part is going to work.

---------------------------------------
PopUp delen:
  • Skär ut i cardstock 17 x 17 cm
  • Biga 8,5 cm på båda sidorna, då får du 4 kvadrater, dessa bigningar ska vara "valleyfold"
  • Nu ska du biga diagonalt, den bigningen ska vara "mountainfold" för att PopUp delen ska fungera.


  • Cut out 2 pieces  9,3 x 8,3 cm in cardstock, score 8,3 cm (=square 8,3 cm x 8,3 cm)
  • Attach tape at the 1cm strip close to the scoring, cut the corners as shown below.

----------------------------------------
  • Skär ut 2 st delar i 9,3 x 8,3 cm i cardstock. Biga 8,3 cm (= fyrkant 8,3 cm x 8,3 cm)
  • Fäst dubbelhäftande tape på 1 cm remsan intill bigningen, snedda hörnen som visas nedanför.


  • These two parts are going to attach at the PopUp part as shown at the picture.
---------------------------------------

  • Dessa två bitar ska fästas på PopUp delen enligt bild.


  • Now the fun starts, to decorate the PopUp part with patterned paper. Cut out 6 pieces 7,8 x 7,8 cm and 2 pieces 7,5 x 7,5 cm.
  • Cut the 7,5 x 7,5 cm pieces diagonal & attach at the "mountain-folding". You cut them like that otherwise it gets to thick.
  • Decorate all of the pieces with diecuts, stamps, pictures and other things you want.
  • Thereafter attach all pieces at the PopUp part in cardstock.


-----------------------------------------

  • Nu börjar det roliga, att dekorera PopUp delen med designark. Skär ut 6 st delar 7,8 x 7,8 cm i designark, samt 2 st delar 7,5 x 7,5 cm.
  • De delar som är 7,5 x 7,5 cm ska skäras diagonalt & fästas där "mountain-vikningen är. Man skär dom för att det inte ska bli för tjockt i vikningen.
  • Dekorera alla delar med utstansat, stämplat, bilder eller annat du vill ha med.
  • Därefter fäster du alla delar på PopUp delen i cardstock.
--------------------------------------


Now it's time to mount the PopUp part at the cardbase

  • Fold the PopUp part. Put tape over nearly the whole part (I use glue as well so that it really holds), se picture below. Don't put tape on the lower part of the PopUp part!

-----------------------------------------


Nu ska PopUp delen monteras på kortstommen  

  • Vik ihop PopUp delen. Sätt dubbelhäftande tape över nästan hela delen (jag har även lite lim för att det ska sitta ordentligt), se bild. Den nedre delen ska inte ha tape/lim!


  • The PopUp part should be attached a few mm from the folding & not on the spine at the cardbase.

----------------------------------------
  • PopUp delen ska fästas några mm från vikningen & ej på ryggen på stommen.


  • Do the same at the other side of the PopUp part.
  • Open the card carefully before the glue has attached to muck & check that it opens & closes as it should.
Now you have done your the PopUp Card and I think there will be more. They are so fun making!


----------------------------------------

  • Limma likadant på andra sidan av PopUp delen.
  • Öppna kortet försiktigt innan limmet har fäst ordentligt & kolla att delen öppnar sig & stänger sig som den ska.

Nu har du gjort ditt PopUp kort, jag tror nog att det kommer att bli fler. För dom är riktigt roliga att göra!


Thanks for joining!
-----
Tack för att ni var med!

DT-Lena


måndag 25 juni 2018

Spiderman


A Spiderman Card for a 6 year old!

So CAS...


Red and black cardstock


for the Spiderman, I'm sorry everybody..
I found this die at Wish...I haven't got a clue where you can find it elsewhere. 


Bye for now!
Lena

A hug and Happy birthday from the nature


Hi there!

Hope that you all are enjoying the summer!
I would like to send you a Sommar Kram, in english "Summer Hug"
So here it comes...
------------------------------
Hej där!
Hoppas att ni alla njuter av sommaren!
Jag skulle vilja skicka er en Sommarkram,
så här kommer den....


For this card with hugs I used:

Stamps:
( The Kram I used are outgoing, check if there is any left or you can find lots of others at Gummiapan)

Die:

Papers:

For the coloring I used Polychromos.

------------------------------

Till detta kort med kramar använde jag:
Stämplar:
( Kram som jag använde är utgående, kolla om det finns någon kvar eller så kan du hitta massor med andra hos Gummiapan)

Die:

Papper:

Till färgläggning så har jag använt Polychromos.


Happy Birthday Card

I just love the stamp happy birthday, it's lovely to color in shades!
I stamped & colored an extra Daisy and used some petals to look like they are falling from the flower.

This is what I used:

Stamps:

Die:

Polychromos for the coloring and Stickles silver on it.

------------------------------

Födelsedagskort

Jag bara älskar stämpeln happy birthday, den är helt underbar att färglägga i olika nyanser!
Jag stämplade & färglade en extra Daisy och använde några blomblad så att det skulle se ut som om dom faller från blomman.

Jag har använt detta:

Stämplar:

Die:

Polychromos till färgläggning och Stickles silver ovanpå.


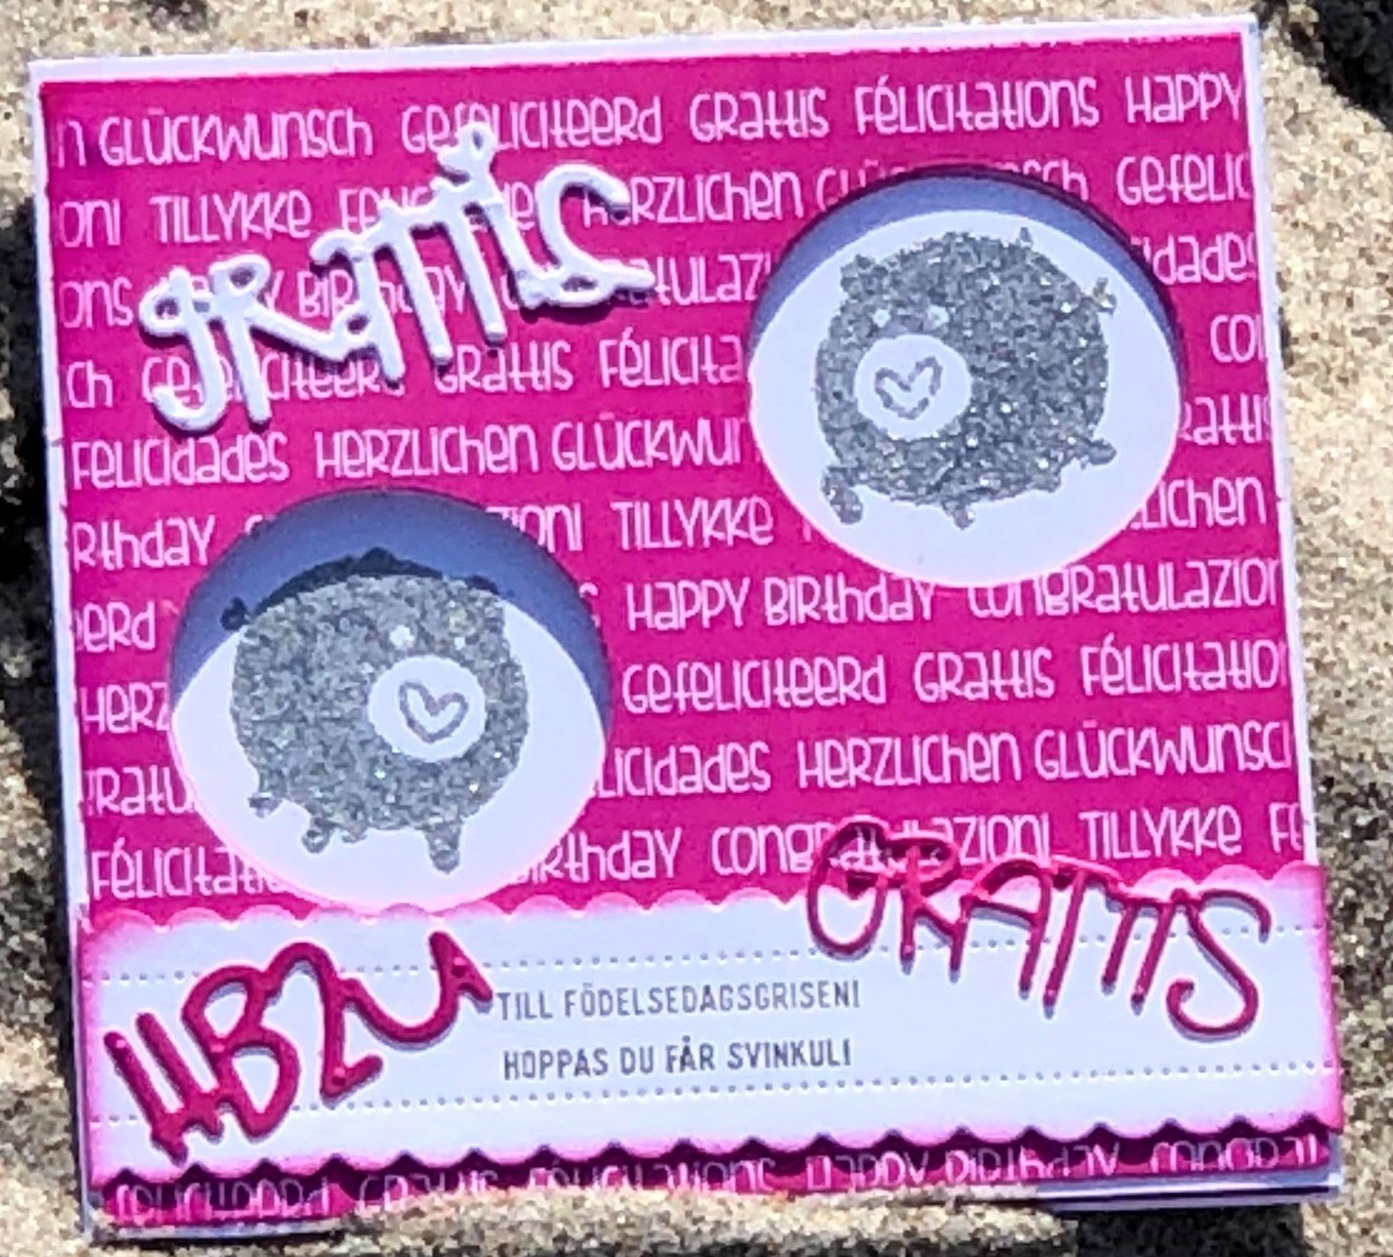
Oink, oink...
Happy Birthday in many languages

Stamps:

Dies:
To make the holes for the pigs you can use either: Pierced circles or Stitched circles

I embossed the pigs in silver, aren't they cute!


------------------------------

Grymt, grymt...
Grattis på födelsedagen på många språk

Stämplar:

Dies:
För att göra hålen till grisarna så kan du använda antingen: Pierced circles or Stitched circles
Jag embossade grisarna i silver, är dom inte söta!


That's all for this time, Sommarkramar to you!

Det var allt för denna gång, Sommarkramar till dig!

DT-Lena


söndag 10 juni 2018

Hello again! Hope you all are well and enjoying the sun!


Made this card for a very dear friend of me, or should I say deer friend...
She got a day in a Spa as a present and there was just one stamp to use for her card, the Badkarsren!
She loves flowers so, I made a frame with the stamp Magnoliakvist
Wishing you a happy day is a stamp that I stuck on to a stitched banner.
The paper is: Gummiapans Cerise serie

I stamped the envelope with Magnoliakvist as well and Hipp Hipp Hurra


Hej igen! Hoppas att ni alla mår bra och njuter av solen!

Jag gjorde detta kort till en kär vän till mig, eller kanske jag ska säga deer friend ...
Hon fick en dag på ett spa i present och det var bara en stämpel som kunde användas till hennes kort, Badkarsren!
Hon älskar blommor så, jag gjorde som en ram med stämpeln Magnoliakvist
Wishing you a happy day är en stämpel som jag fäste på  stitched banner.
Papper från Gummiapans Cerise serie

Jag stämplade kuvertet med Magnoliakvist också och Hipp Hipp Hurra


I guess that you all wonder, what has she done? My mind went a bit crazy when I saw one of Gummiapans new dies: Labyrinth... The only thing I saw was pipes and steampunk!
So this is what I did:
I used Brushos on white cardstock.
I made pipes from the new die Labyrinth 
also used the dies HB2U and the so cute Mr Nautilus
Stamps that I used: luftballong ,kugghjul#3  kugghjul#4, , kugghjul#6. I embossed all the gears.


Kan tänka mig att ni undrar, vad har hon gjort? Min hjärna blev lite galen när jag såg en av Gummiapans nya dies: Labyrinth... Det enda som jag såg var rör och steampunk!
Det här är vad jag gjorde:
Jag använde Brushos på vid cardstock
Jag gjorde rör från den nya diesen Labyrinth 
jag använde också diesen HB2U och den söta Mr Nautilus
Stämplar som jag använt mig av: luftballong ,kugghjul#3  kugghjul#4, , kugghjul#6. Jag embossade kugghjulen


And here is the die, Labyrinth shown as it should be. My little Bobbie has to find the way to all his presents, I used the stamp Bobbie and the die Bobbie.
The mini die paket I got as a gift at Trelleborgsträffen, isn't it cute!
Stamps: Go wild, Unwrap me comes from a set of stamps, Små ord
The papers are: Cerise serie and Limegrön serie.

Här är diesen, Labyrinth som den ska vara. Min lilla Bobbie måste finna sin väg till alla hans presenter, Jag använde stämpeln Bobbie och diesen Bobbie.
Minipaketet fick jag som en gåva på Trelleborgsträffen, visst är den söt!
Stämplar: Go wild, Unwrap me kommer från ett textset, Små ord
Papper som jag har använt: Cerise serie and Limegrön serie.

Thats all for now folks!

Det är allt just nu!

DT-Lena


fredag 25 maj 2018


Hi there!

Today I've been playing with dinosaurs , never to old!
My dinosaur is a die and comes from Gummiapan, it's one of their new dies.
He is Origami Sellosarus and another die I used is Grattis
To make the wonderful clouds I used the new stamps: Molnigt
and for the stones: Stenar
A dinosaur need something to eat, but I used som leafs that you can't buy anymore, sorry! But, cheer up! There are many different leaves you can find instead:
For example: Folium, Inaequale and Inversus 
The paper you can see with stripes is Gummiapans olivgrön serie


Hej där!

Idag har jag lekt med dinosaurier, aldrig för gammal!
Min dinosaurie är en die och kommer från Gummiapan, det är en av deras nya dies.
Han är Origami Sellosarus och en annan die jag har använt är Grattis
För att göra dom underbara molnen så har jag använt de nya stämplarna Molnigt
och till stenar Stenar.
En dinosaurie behöver något att äta, men jag använde blad som du inte kan köpa längre, förlåt! Men, bli gladare! Det finns många olika blad som du kan hitta istället:
Exempelvis: FoliumInaequale och Inversus 
Pappret som du kan se med ränder är  Gummiapans olivgrön serie


It's not only my friend that is wild & crazy - I am too☺
When I first laid eyes on this stamps I saw a color-explosion and I just had to color it!
The stamp that took me to fantasyland is: Fantasiblommor
I also used the stamps Thanks for being...
The die is: Scalloped Squares

Det är inte bara min vän som är lite wild & crazy - det är jag också ☺
När jag först såg dessa stämplar så såg jag jag en färgexplosion och jag var bara tvungen att färglägga dom.
Stämplen som tog mig till fantasilandet är: Fantasiblommor
Andra stämplar som jag använde: Thanks for being...
Den die jag använt är: Scalloped Squares


A wedding card for the happy couple
Dies that I used: Scalloped Circles, Old tags, Dubbelhjärta, Hjärtan and the cute Birdie
Stamps: Groda, I borrowed the hat and the tie from Roger the Rabbit, thanks Roger! 
The texts Presentkort & I'm so hoppy are embossed in gold and then you have Lycka till.

Ett bröllopskort till det lyckliga paret
Dies som jag har använt: Scalloped CirclesOld tagsDubbelhjärtaHjärtan och den söta Birdie
Stämplar: Groda, jag lånade hatten och slipsen från Roger the Rabbit,, tack Roger!
Texterna Presentkort & I'm so hoppy är embossade i guld och sen är det Lycka till.


I used Polychromos for coloring
Jag har använt Polychromos till färgläggningen.

Bye for now, see you soon!
Hej då så länge, vi ses snart!

DT-Lena