söndag 5 april 2020

Påskhälsningar från hönsfamiljen!


Happy Easter to you all!

-----

Glad Påsk till er alla!


Oh no, some of them fell of the broom...

-----

Oh nej, några av dom ramlade av kvasten...


This is what I used/det här använde jag:


Stamps/Stämplar:

Dies:


Take care!

Ta hand om dig!

DT-Lena


onsdag 25 mars 2020

Easel hat card


A Hat Card
I've seen them everywhere so, I just had to try to make one!

-------

Ett Hatt Kort
Jag har sett dom överallt så, jag måste ju göra ett!


This is what I used/det här använde jag:


Dies:


This is how I made this card/så här gjorde jag kortet:

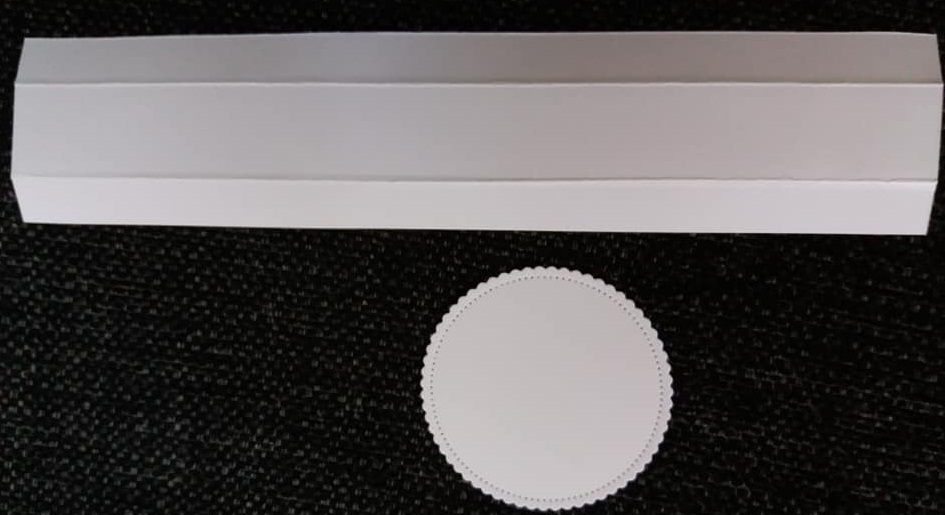
PS. I made the tutorial in white because it's easier to see than in black.
Jag gjorde beskrivningen i vitt för det är enklare att se än i svart.


Use the smallest of the circle dies. 
Cut a strip of cardstock measuring: 23 x 5 cm.
Score the strip at: 1,2 cm & 3,8 cm

-----

 Använd den minsta cirkeldiesen.
Skär en remsa av cardstock: 23 x 5 cm.
Biga remsan på: 1,2 cm & 3,8 cm


Cut the strip at both sides from bottom up to the score line to make tiny tabs.
And attach the strip to the circle (the tabs will wrap around each other)
Do this all around, you might have to cut off a cm or 2 in the end.

-----

Klipp upp på båda sidorna nerifrån och upp till den bigade linjen för att göra små flikar.
Fäst remsan på cirkeln, flikarna kommer ligga omlott.
Gör detta runt hela cirkeln, du kanske måste klippa bort nån cm eller två i slutet.


This is how it should look/så här ska den se ut:


I decorated with Gummiapans paper

The top of the hat: the smallest circle
The strip: approximately  21 x 2,4 cm 
Then the middle of the circle die to attach the hat on.

-----

Jag dekorerade med Gummiapans papper

Toppen av hatten: den minsta cirkel diesen
En remsa: ca  21 x 2,4 cm 
Sen den mittersta cirkel diesen, för att fästa hatten på.


The hat is done, now how to make the card base
---
Hatten är klar och nu ska kortbasen göras


Cut a piece of cardstock at 28 x 14 cm, score at 14 cm. Fold so that you'll get a card
Then you take the biggest of the circle dies and place it as I show in the picture below. 
Run it through your machine and fold the upper circle in half ( it won't be exactly because the circle isn't whole)

-----

Skär ut cardstock 28 x 14 cm, biga på 14 cm. Vik så att du får ett kort.
Sen tar du den största cirkel diesen och placerar den som jag visar i bilden nedan.
Stansa ut i maskinen och vik den övre cirkeln på hälften (det blir inte exakt för att cirkeln inte är hel)


You need another of the big circle dies to put on the base

---
 Du behöver ytterligare en av de stora cirkeldiesen för att fäsa på basen.


Now it's time to attach the hat and decorate the card!

-----

Nu är det dax att fästa hatten och dekorera kortet!


Good Luck with your hat card!

Lycka till med ditt hatt kort!

DT-Lena


söndag 15 mars 2020

Save the date & aprils kalenderblad


Save the date invitation 

-----

Spara datumet inbjudan 


I


This is what I used/det här använde jag:


Stamp/stämpel:

Die:


---------------------------------------


And...
here is april calender page

och...
här är aprils kalender sida


This is what i used /det här använde jag:


Stamps/stämplar:


Dies:

If you want the months in german you find them here: Tyska månader

If you want the days in german you find them here: Tyska veckodagar


Take Care!

Ta hand om dig!

DT-Lena


torsdag 5 mars 2020

Satan i gatan - här kommer jag!


Hi there, here come some new stamps again. Just love the new sassy text stamps!

-----

Hej där, här kommer några nya stämplar igen. Jag bara älskar dom nya busiga textstämplarna!


To make this card I used/för att göra det här kortet så har jag använt:


Stamps/Stämplar:


I used Polychromos for coloring
Jag har använt Polychromos till färgläggningen.


Take care!
Ta hand om dig!

DT-Lena

tisdag 25 februari 2020

Imorgon eller nästa vecka...


So many stamps...

It wasn't easy to choose among all the wonderful stamps that Gummiapan has released!
But when I saw the cat and the aquarium I got an idea, so here it is... 

-------

Så många stämplar...

Det var inte lätt att välja bland alla underbara stämplar som Gummiapan har släppt!
Men, när jag såg katten och akvarium så fick jag en idé och här är den...


This is what I used to make this card/detta använde jag för att göra kortet:


Stamps/stämplar:


Dies:
Oval dies (The one I used has expired)


Take care!

Ta hand om dig!

DT-Lena


lördag 15 februari 2020

Lots of dogs


In today's blog-post I'm going crazy about dogs!

-------

I dagens blogg inlägg så är jag galen i hundar!


Since Gummiapan doesn't have a loooong dog, I made him long (I think it's a him)

Super easy, stamp the dog onto the card when it's folded. Unfold it and draw the lines so that the dog are whole again.

-----

Eftersom Gummiapan inte har en låååång hund, så fick jag göra honom lång. 

Super enkelt, stämpla hunden på ett kort när det är vikt. Vik upp det och rita linjerna så att hunden blir hel igen.


This is what I use to make this card/ Det här använde jag för att göra kortet:


Stamps/stämplar:

Dies:

----------------------------------

and of course, the calendar for Mars! Also with dogs.

-----

och självklart, kalendern för Mars! Också den med hundar.


This is what I used/det här använde jag:


Dies:
If you want the months in german you find them here: Tyska månader

If you want the days in german you find them here: Tyska veckodagar


The swing is from the adventcalender 2019/
Gungan är från adventskalendern 2019

Stamps/stämplar:


Thats all for now, take care!

...........

Det var allt för idag, ta hand om dig!


DT-Lena


onsdag 5 februari 2020

Kort med ficka


This card is a card with place for many messenges!
Maybe some lovenotes...

--------

Här är ett kort med mycket plats för meddelanden!
Kanske några kärleksord...


This is what I used to make this card/det här använde jag för att göra kortet:


Stamps/Stämplar:

Dies:


The paper I bought at Trelleborgsträffen at Gummiapan.

--------

Pappret köpte jag hos Gummiapan på Trelleborgsträffen.

-------

This is how I made this card/Så här gjorde jag kortet:

First I made a basic cardbase 13 x 13 cm

To make the pocket, cut 1 piece at: 15 x 12 cm, score 1 cm at each side that measures 15 cm and 1 cm at one of the 12 cm side. See the picture to the left below.
The piece at the right measures 13 x 11 cm, no scoring.

--------

För att göra fickan, skär ut 1 del:15 x 12 cm, biga 1cm på varje sida som mäter 15 cm och 1 cm på en av sidorna som mäter 12 cm. Se bilden till vänster nedan.
Delen till höger mäter 13 x 11 cm, ingen bigning.


Use the Scalloped Banner Border and run both pieces though your machine.

-------

Använd Scalloped Banner Border och kör igenom den i din maskin.


Attach the pieces together to make the pocket, but don't fasten the tab on the 12 cm side. See the picture below.

-----

Fäst ihop delarna till en ficka, men fäst inte fliken på 12 cm sidan. Se bilden nedan.


Put some glue near the edge between the papers.


Sätt lite lim nära kanten mellan papprena


Now you can attach your pocket at the cardbase, see picture below.

Nu kan du fästa din ficka på kortbasen, se bilden nedan.


This is how it should look/ Så här ska det se ut.


To make the insert/tag to fit in the pocket, choose a size that you like and use the Scalloped Banner Border.

------

För att göra tagen som ska vara i fickan, välj en storlek som du gillar och använd  Scalloped Banner Border.

------

So, now it's time for the fun...decorating your card! 

------

Så, nu är det dags för det roliga...dekorera ditt kort!


I hope that you'll have a lot of fun making this card!

Hoppas att du får roligt när du gör detta kort!

Take care/ Ta hand om dig!

DT-Lena