Hi there!
As some of you probably already know I'm crazy about card foldings.
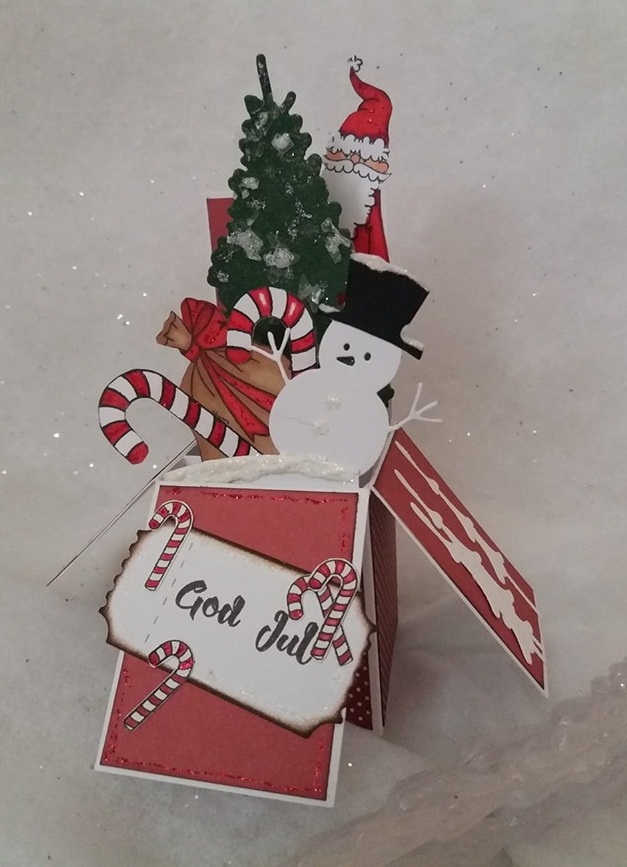
So here comes another one
It's a Pop Up Box Card!
------------------------------
Hej där!
Som du kanske redan vet så är jag galen i kortvikningar.
Så här kommer en till
Det är en Pop Up Box Card!
Front/framsida
Back/baksida

No problems sending it, you just fold it together!
Inga problem att skicka det, bara vik ihop det!

This is what I used to make this card:
Det här använde jag för att göra kortet:

Stamps/stämplar:
Dies:
The tutorial
1 piece of cardstock: 8 1/2" x 5" - the box
3 pieces of cardstock: 3 1/4" x 1" - "holders"
- Score the box piece with the 5" side up at 2 1/2" down to 6"
- Turn the paper so that you get the 8 1/2" side up.
- Cut 2", 4", 6" & 8" down to the scored line (2 1/2")
- Now you score from the cut-lines down to the bottom at 2", 4", 6" & 8". You don't turn the paper, just keep going from the cuts to scoring. See picture below.
- You'll get a tab on the right side = 1/2". Cut off the part above the score line and cut the corners at the tab you got left. See picture below.
--------------------------------
Beskrivning
1 del cardstock: 8 1/2" x 5" - asken
3 delar cardstock: 3 1/4" x 1 - hållare
- Biga ask delen med 5" sidan uppåt på 2 1/2" ner till 6"
- Vänd pappret så att du får 8 1/2" sidan uppåt.
- Skär 2", 4", 6" & 8" ner till den bigade linjen (2 1/2")
- Nu ska du biga från det du har skurit ner till botten 2", 4", 6" & 8". Vänd inte pappret, utan fortsätt från det du har skurit och gå över till att biga. Se bilden nedan.
- Du har en flik på höger sida = 1/2". Skär av den övre delen ovanför biglinjen och snedda hörnen på flliken du har kvar. Se bilden nedan.

Red lines = cut/ skär
Blue lines = score/ biga
Before putting the box together, decorate your box with pattern paper.
- 2 pieces 4 7/8" x 1 7/8" - front & backside panel that isn't scored
- 6 pieces 2 3/8" x 1 7/8" - for the other parts
- Attach glue on the tab and close the box.
--------------------------------
Innan du sätter ihop asken, så dekorera med mönstrat papper.
- 2 delar 4 7/8" x 1 7/8" - fram och baksida av panelen som inte är bigad.
- 6 delar 2 3/8" x 1 7/8" - dom andra delarna.
- Sätt lim på fliken och stäng asken.

Now you're going to make the "holders" for the decorations inside the box.
- Score the 3 pieces at 5/8" in both ends.
- There are two ways to fasten the decorations at the holders
- If you want something higher up, you can use a strip of acetate. Attach the decoration with strong tape (I used red tape, cause when I used glue the decoration fell of). Then you attach it on the holder in the height that you want.

or...
- you can attach your decoration directly on to the holder.

Nu ska du göra hållarna för dekorationerna som ska vara inne i asken.
- Biga de 3 delarna 5/8" i båda ändarna.
- Det finns två sätt att fästa dekorationerna på hållarna.
- Om du vill ha något högre upp, så kan du använda en remsa acetat. Fäst dekorationen med en stark tejp (jag använde röd tejp, för när jag använde lim så föll dekorationen av) Sen fäster du den på hållaren i den höjd som du vill.
eller...
- så kan du fästa dekorationen direkt på hållaren.
------------------------------
This is how you fasten the holder in to the box:/ Så här fäster du hållaren i asken:


Tips...
When you use decorations that stick out on the sides of the box, try to close the box to a card. You might have to move something to be able to close the box.
If you want more holders, cut off a bit of the sides that you scored
and
if you want even more decorations, you can put more than one on to the holder.
-------------------------------
Tips
När du använder dekorationer som sticker ut från sidorna av asken, försöka att stänga asken till ett kort. Du kanske måste flytta på något för att kunna stänga asken.
Om du vill ha fler hållare, skär bort en bit av sidorna där du har bigat
och
om du vill ha ännu mer dekorationer, så kan du sätta fler än en på din hållare.
Good luck with your box!
-----
Lycka till med din box!
DT-Lena
Inga kommentarer:
Skicka en kommentar