onsdag 25 december 2019

Väggkalender Januari 2020


I would like to wish you a
Happy New Year!

----------------

Jag vill önska er ett
Gott Nytt År!

----------------

I'm going to start 2020 with a new calendar.

So far I only made January, but I will make all months.
My idea is to put the calendar on a canvas (haven't done that jet)
.
I haven't decided how to fasten it, so that I can change months. 
Maybe double sided tape and carefully remove the month when I'm going to change.


-----------------

Jag ska börja 2020 med en ny kalender.

Så här långt har jag bara gjort Januari, men jag ska göra alla dom andra månaderna.
Min idé är att fästa kalendern på en canvas (har inte gjort det ännu).

Jag har inte bestämt mig för hur jag ska fästa den, så att jag kan byta månad
Kanske dubbelhäftande tejp och försiktigt ta bort den när jag ska byta .

January/Januari


To make this I used/för att göra den så har jag använt:


Dies:
If you want the months in german you find them here: Tyska månader

If you want the days in german you find them here: Tyska veckodagar

Stamps/stämplar:

-------------


I hope that you will have a wonderful and creative 2020
Lots of hugs

--------------

Jag hoppas att du får ett underbart och kreativt 2020
Massor med kramar


Gummiapan
DT-Lena


söndag 15 december 2019

Nyårsinbjudan 2020


New Year party

Invitation
and
placing card

-------------------------

Nyårsparty

Inbjudan
och
placeringskort


This is what I use to make the card/ Det här har jag använt för att göra kortet:


Dies:

and/och silver Stickles


This is what I use to make the placing card/ Det här har jag använt för att göra placeringskortet:


and/och silver Stickles

I hope this gave you some inspiration for new year!

---------------

Jag hoppas att du fick lite inspiration till nyår!


Take care!

---------------

Ta hand om dig!


DT-Lena

torsdag 5 december 2019

Triss i julgranar


Christmas trees triplets


I made three cards with Christmas trees this time.

------------------

Triss i julgranar

Jag har gjort tre kort med julgranar den här gången


This is what I used to make this card/detta använde jag för att göra kortet:


Dies:

Stamps/stämpel:

______________________________________________


This is what I used to make this card/detta använde jag för att göra kortet:


Dies:


I decorated the christmas tree with gemstones and stickles. It doesn't really show here, but it's lots of glitter.

-----------------

Jag har dekorerat julgranen med rhinestones och stickles. Det syns inte riktigt här, men det är mycket glitter.


___________________________________________


This is what I used to make this card/detta använde jag för att göra kortet:

Dies:


Soon it's time to decorate the Christmas tree...

Snart är det dags att klä julgranen...


DT-Lena


måndag 25 november 2019

God Jul


Longing for Christmas

---------------

Längtar efter Julen

------

Christmas music on the radio
Christmas decorations in the stores
I'm really getting in the christmas mood now.

------

Julmusik på radion
Juldekorationer i affärerna
Jag får verkligen jul känslor nu.

------

Here comes Santa in white, black and red

------

Här kommer Tomten i vitt, svart och rött


This is what I used to make this card/
Det här har jag använt för att göra kortet:

Stamps/stämplar:


Dies


Take care!

------

Sköt om er!

DT-Lena

fredag 15 november 2019

Dreaming of Candycanes


Sliding card with Candycanes!

-----

Sliding kort med polkagrisar!


Yummie yummie..candycanes and candys for the reindeer!

---------------

Nam nam...polkagrisar och godis till renen!


When I made this card I used Rörelsebanor, so that the slider can move in it.

---------------

När jag gjorde det här kortet så använde jag Rörelsebanor, så att slidern can röra sig.


I used a coin and to make the slider heavy, I think it moves better.
I cut a piece of foam (as a distance) and attached it to the coin using strong red tape and red tape on top of the foam as well.
Put the coin underneath the card so that the foam fits in the hole and attach santas hat on top of it.

---------------

Jag använde ett mynt så att slidern blev tyngre, jag tycker att den rör sig bättre då.
Jag klippte en bit mossgummi (för distans) och fäste den på myntet med stark röd tejp. 
Fäste röd tape på mossgummit också.
Lägg myntet under kortet så att mossgummit passar in hålet och fäst tomteluvan ovanpå.


To make the hat slide better, use 3D tape. At the picture I used one layer. But, I recommend two layers of 3 D tape. This is to get a really god distance and the slider moves easy.
Now it's ready to put on your card base.

---------------

För att tomteluvan ska röra sig bättre, använd 3D tejp. På bilden använde jag ett lager, men jag rekommenderar att använda 2 lager 3D tejp. Det ger en riktigt bra distans och slidern rör sig lätt.
Nu är det färdigt att fästa på din kortstomme.

-----------------


I used this products to make the card:/ Produker som jag använde för att göra det här kortet:

Stamps/Stämplar:

Dies:

The reindeer I used is expired, but you can find other lovely reindeers here
Renen som jag har använt har utgått, men du kan hitta andra superfina renar här: 


Bye for now!
Hugs, 

-----

Hej då så länge!
Kramar,


DT-Lena

tisdag 5 november 2019

Snowglobe


I just love snowglobes!

So, here is my snowglobe for you.

----------------

Jag bara älskar snöglobar!

Så, här är min snöglob till dig.


This is how I made my snowglobe...

I run a circle die through my Big shot to get the globe.
Stamped it with the snowman and colored it.
The snow are made with embossing enamel.

I draw the bottom/holder, see picture below.

------------------------------

Så här gjorde jag min snöglob...

Jag stansade ut en cirkel för att få globen.
Stämplade en snögubbe och färglade den.
Snön är gjord med embossing enamel.

Jag ritade botten/hållaren, se bilden nedan.


Cut out the holder and cut an opening for the globe.
This is how it looks with Distress ink:

---------------------------

Klipp ut hållaren och skär en öppning för globen
Så här ser den ut med Distress ink:


I stamped the message and put the snowglobe in to the cut I made.

The background of the card is made with Distress ink and embossed white snowflakes.

------------------------------

Jag stämplade meddelandet och satt snögloben i skåran jag hade gjort.

Bakgrunden på kortet är gjort med Distress ink och embossade vita snöflingor.


This i what I used to make this card:/
Det här har jag använt för att göra kortet:


Die: 

Stamps:

Snöflinga
 (snowflake, I think we got this one in our goodiebag at Trelleborgsträffen)
(snöflingan, jag tror att vi fick den i goodiebagen på  Trelleborgsträffen)

But Gummiapan has got more snowflakes, here is a few:/
Gummiapan har fler snöflingor, här är några:


Snowy hugs

Snöiga kramar

DT-Lena

fredag 25 oktober 2019

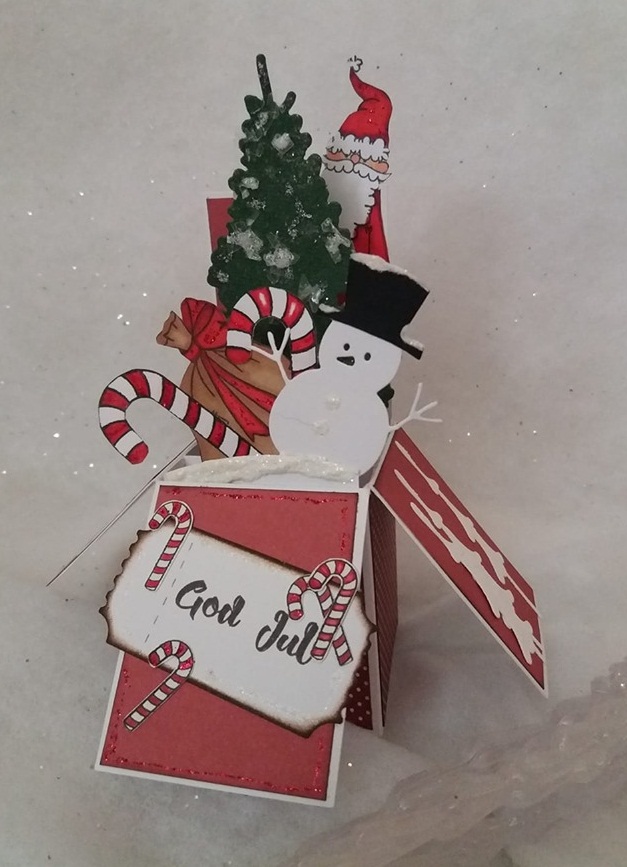
Christmas - Pop Up Box Card

Hi there!

As some of you probably already know I'm crazy about card foldings.
So here comes another one

It's a Pop Up Box Card!

------------------------------

Hej där!

Som du kanske redan vet så är jag galen i kortvikningar.
Så här kommer en till

Det är en Pop Up Box Card!


Front/framsida


Back/baksida


No problems sending it, you just fold it together!
Inga problem att skicka det, bara vik ihop det!


This is what I used to make this card:
Det här använde jag för att göra kortet:


Stamps/stämplar:

Dies:


The tutorial


1 piece of cardstock: 8 1/2" x 5"  - the box
3 pieces of cardstock: 3 1/4" x 1" - "holders"

  • Score the box piece with the 5" side up at 2 1/2" down to 6"
  • Turn the paper so that you get the 8 1/2" side up. 
  • Cut 2", 4", 6" & 8" down to the scored line (2 1/2")
  • Now you score from the cut-lines down to the bottom at 2", 4", 6" & 8". You don't turn the paper, just keep going from the cuts to scoring. See picture below.
  • You'll get a tab on the right side = 1/2". Cut off the part above the score line and cut the corners at the tab you got left. See picture below.

--------------------------------


Beskrivning


1 del cardstock: 8 1/2" x 5"  - asken
3 delar cardstock: 3 1/4" x 1 - hållare

  • Biga ask delen med 5" sidan uppåt på 2 1/2" ner till 6"
  • Vänd pappret så att du får 8 1/2" sidan uppåt.
  • Skär  2", 4", 6" & 8" ner till den bigade linjen (2 1/2")
  • Nu ska du biga från det du har skurit ner till botten  2", 4", 6" & 8". Vänd inte pappret, utan fortsätt från det du har skurit och gå över till att biga. Se bilden nedan.
  • Du har en flik på höger sida = 1/2". Skär av den övre delen ovanför biglinjen och snedda hörnen på flliken du har kvar. Se bilden nedan.


Red lines = cut/ skär
Blue lines = score/ biga


Before putting the box together, decorate your box with pattern paper.

  • 2 pieces 4 7/8" x 1 7/8" - front & backside panel that isn't scored
  • 6 pieces 2 3/8" x 1 7/8" - for the other parts                                 

  • Attach glue on the tab and close the box.        

--------------------------------


Innan du sätter ihop asken, så dekorera med mönstrat papper.

  • 2 delar  4 7/8" x 1 7/8" - fram och baksida av panelen som inte är bigad.
  • 6 delar  2 3/8" x 1 7/8" - dom andra delarna.
  • Sätt lim på fliken och stäng asken.


Now you're going to make the "holders" for the decorations inside the box.

  • Score the 3 pieces at 5/8" in both ends.
  • There are two ways to fasten the decorations at the holders
  • If you want something higher up, you can use a strip of acetate. Attach the decoration with strong tape (I used red tape, cause when I used glue the decoration fell of). Then you attach it on the holder in the height that you want.


or...

  • you can attach your decoration directly on to the holder.  


Nu ska du göra hållarna för dekorationerna som ska vara inne i asken.

  • Biga de 3 delarna 5/8" i båda ändarna.
  • Det finns två sätt att fästa dekorationerna på hållarna.
  • Om du vill ha något högre upp, så kan du använda en remsa acetat. Fäst dekorationen med en stark tejp (jag använde röd tejp, för när jag använde lim så föll dekorationen av) Sen fäster du den på hållaren i den höjd som du vill.

eller...

  • så kan du fästa dekorationen direkt på hållaren.

------------------------------


This is how you fasten the holder in to the box:/ Så här fäster du hållaren i asken:


Tips...
When you use decorations that stick out on the sides of the box, try to close the box to a card. You might have to move something to be able to close the box.

If you want more holders, cut off a bit of the sides that you scored
and
if you want even more decorations, you can put more than one on to the holder.


-------------------------------


Tips
När du använder dekorationer som sticker ut från sidorna av asken, försöka att stänga asken till ett kort. Du kanske måste flytta på något för att kunna stänga asken.

Om du vill ha fler hållare, skär bort en bit av sidorna där du har bigat
och 
om du vill ha ännu mer dekorationer, så kan du sätta fler än en på din hållare.


Good luck with your box!
-----
Lycka till med din box!

DT-Lena